Noodletools for Students
| Site: | Learnbps |
| Class: | Moodle Template Exchange |
| Book: | Noodletools for Students |
| Printed by: | Guest user |
| Date: | Tuesday, March 24, 2026, 1:26 AM |
Description
This book will have instructions and tutorials on the use of Noodletools as an option for citations, notetaking, and outlining for student use.
New User Registration
New User Registration
Creating your personal folder
- On the login screen, click Create a Personal ID
- You will be taken directly to the New User Registration screen.
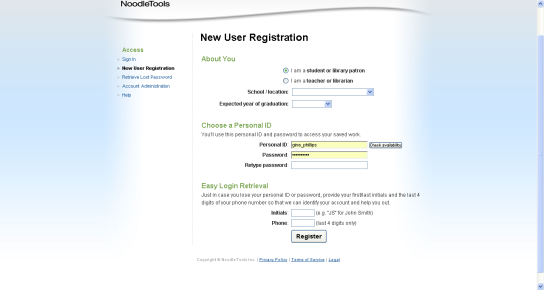
Choose "I am a student" and pull the drop down boxes to select your school and your year of graduation.
Choose your personal ID - please use the following login:
- Personal ID = computer login
- Password = student number
Please note: If you are accessing Noodletools from home (or any computer outside of BPS) for the first time, talk to your librarian or teacher to get the remote logins to access the subscription (also available on the database password sheet available through the school libraries).
Enter your first and last name initials along with the last 4 digits of your phone number which will be used as a prompt case you forget your username and password. Click REGISTER!
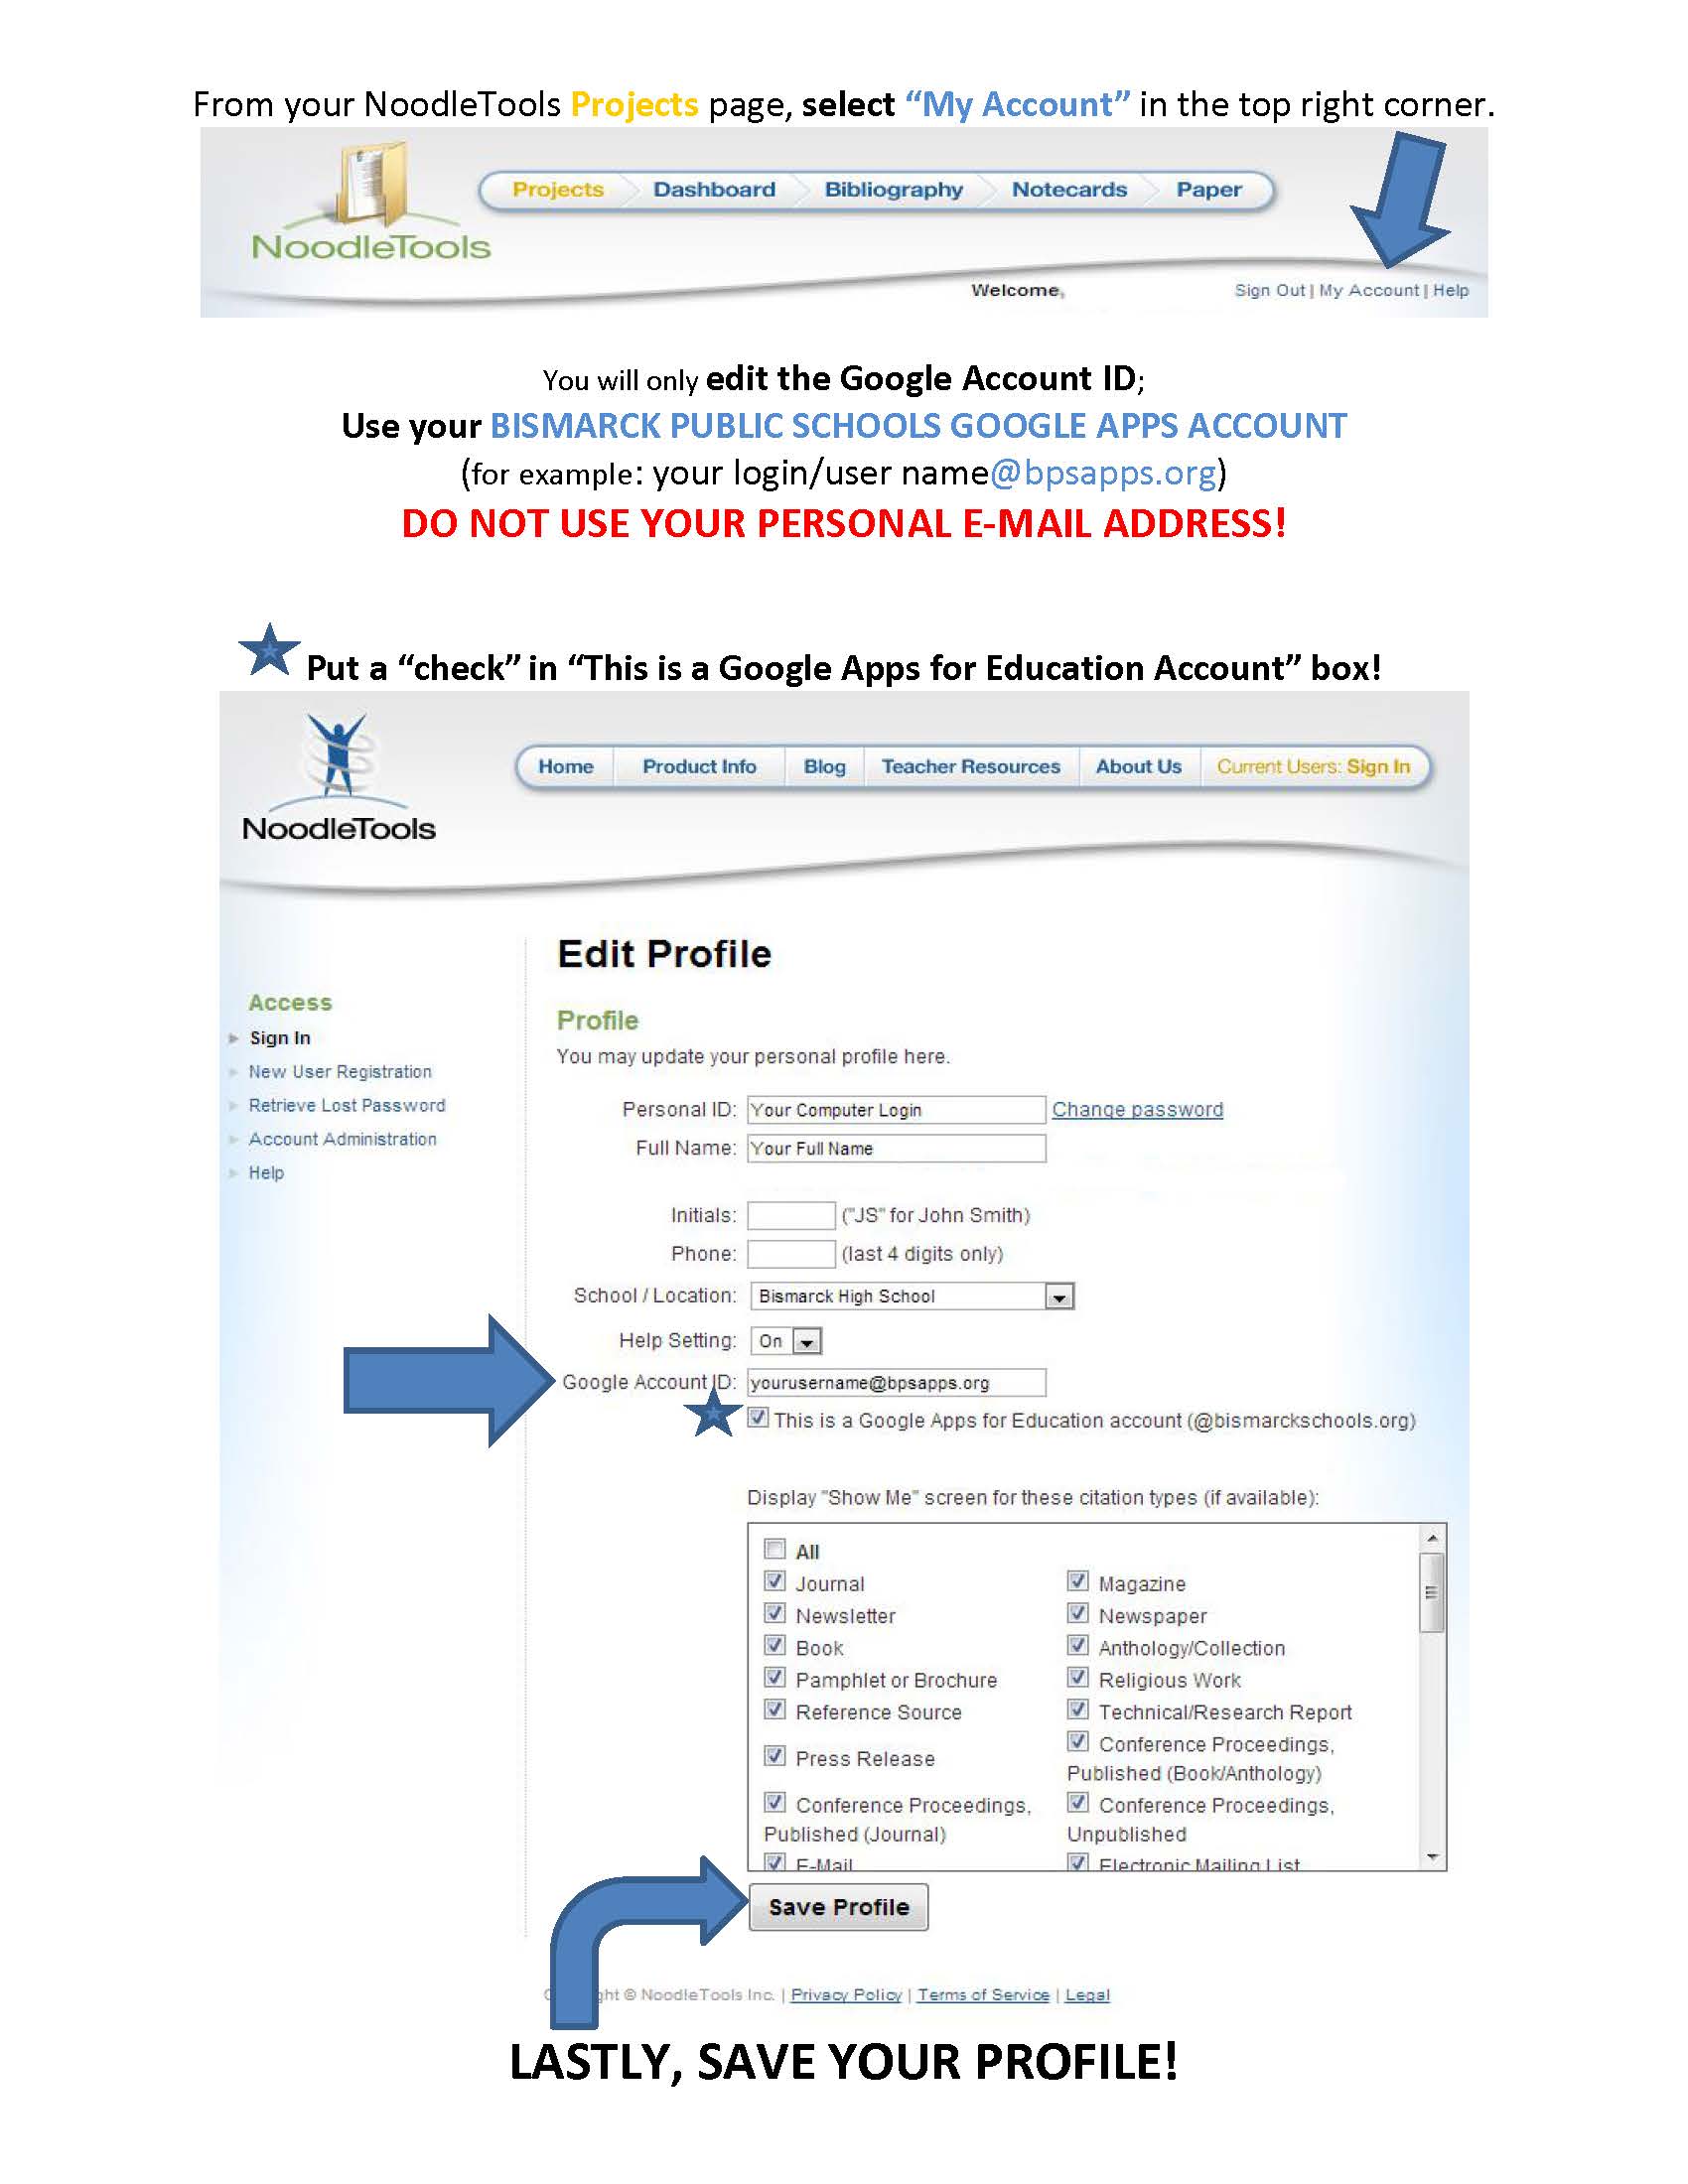
Linking NoodleTools Profile to your Google Apps for Education Account
Personal Folders
The My Projects screen of your personal folder provides you with a unified view of all the projects that you have access to in NoodleTools.
The first time you open your personal folder, it will be empty. A single empty table titled My Projects is displayed, along with a
large button titled Create a New Project.
To create a new project, click the Create a New Project button in your personal
folder (with My Projects selected). On the Create a New Project screen, you must provide some information before NoodleTools allows you to begin a project:
→ Step #1: Choose the source list style
Ask your teacher or instructor before choosing between MLA, APA, and
Chicago. You will be able to change the style later if you need to, but
since the data required to cite a source in one style can be different in
another style, it is always best to start with the citation style your teacher is requesting.
→ Step #2: Choose the project level
NoodleTools allows you to select between three levels: Starter, Junior
and Advanced. These are intended to roughly correlate with a student’s
grade level:
Starter: Elementary school or middle school ESL learners
Junior: Middle school or high school ESL learners
Advanced: High school, college, graduate school, and professional
→ Step #3: Provide a brief description
Enter a brief description that will help you remember the contents or
purpose of this project when you see it later among other projects in
your personal folder.
At the bottom of the page, click Create Project to begin a new project. If you change your mind, click Cancelto return to your personal folder.
Complete User's Guide from Noodletools
Complete User's Guide from Noodletools - use this guide for all the extra tips and tricks of Noodletools
Citing Sources
Formatting Guide Tutorial
The following video tutorial shows you how to create citations within Noodletools. It is recommended to start your works cited page before you begin your notecards so each notecard can be "linked" to the original source.
Make changes to your source type, content type, and medium without loosing data.
Create Notecards
Creating an outline
How to create a note card with NoodleTools
Adding Notecards to Outline
how to add notecards to an outline in NoodleTools
Google Docs Integration
Please view the tutorial on how to use Google Docs to write your paper.
When signing in to Google Docs, please use your bpsapps google account (i.e. username@bpsapps.org). Need help signing in to your Google account? View these directions.
How to Set up Google Docs for your paper
Collaborating with another student
Tutorial on how to collaborate with a fellow student on a paper.
Sharing your project with your teacher
Directions on how to share an assignment with a teacher.
Printing and Adding Source Lists to Your Paper
Printing citations
Formatting
Before you export your source list and open it in your word processor,
NoodleTools allows you to do some basic formatting. To see the formatting
options, click the Print/Export button at the top of the Bibliography screen and
select “Formatting Options...”
Changing the title
By default, MLA lists are titled “Works Cited,” APA lists are titled “References,” and Chicago lists are titled “Bibliography.” These are the most common titles, but you may want a title that more accurately reflects the contents of your particular source list. For example, if you have added annotations to your MLA list, a more descriptive title would be “Annotated List of Works Cited.”
→ Click the Print/Export button.
→ Under Formatting Options, click the link next to “List Title.”
→ If you are creating an MLA style list, select one of the titles from the
examples listed by clicking on the associated hyperlink, or create your
own title by typing a title in and clicking Set Custom Title.
→ If you are creating an APA or Chicago style list, no preset alternatives are provided. Simply type your own title in and click Set Custom Title.
Adding a header (MLA and APA only)
A “header” is information that appears at the top of each page of your paper.
The MLA Handbook indicates that the header at the top of your source list should consist of your last name followed by a space and the page number. The APA Publication Manual states that the header should consist of a shortened version (50 characters or fewer) of the title of your paper (all capital letters, flush left), and the page number (flush right, continued from the body of the paper). If you are not writing a paper that will be published, a header is generally not required (you can ask your teacher if you aren’t sure). NoodleTools can add the header to your source list for you, correctly formatted (although you will still
need to make sure that it also appears throughout your essay).
→ Click the Print/Export button above your source list.
→ Under Formatting Options, click the link next to “Page Header.”
→ If you are creating an MLA style list, enter your last name and click Set
Header.
→ If you are creating an APA style list, enter a shortened version of your
paper’s title and click Set Header.
Printing
The final version of your source list should always be printed from your word processor. Do not print your source list from the Preview screen (described in the next section) because the HTML version is not perfectly formatted – it is only a close approximation of the correct spacing and formatting.
My Projects
My Projects
When you create a project in NoodleTools, it will appear in the My Projects table. The project that was most recently revised will appear at the top. To open a project, click the hyperlink under the Description heading. The project that you are currently editing will be displayed in your personal folder with a yellow background and the word “open” in parentheses beside the project description.
Column headings and their meanings
→ Description: A short description that you create when you start a new project. It helps you remember the contents of each project in your personal folder. Keep in mind that your teacher or instructor will see your written description if you share this project with him or her.
→ Style: MLA, APA, or CHI (Chicago)
→ Level: Starter, Junior or Advanced
→ Entries: The number of citations in the source list
→ Notes: The number of notecards associated with the project (only visible if the notecards feature is enabled).
→ Created: The date and time you first created the project
→ Modified: The date and time you last edited the project
→ Shared?: Indicates if you have shared the project with a teacher’s drop box, and whether or not new feedback has been submitted to you.
Indicators are:
o Blank = the project has not been shared.
o √ = the project has been shared but no new feedback has been
submitted back to you.
o √ = the project has been shared and there is new feedback on
citations and/or notecards that you can view by opening the project.
o Mouse-over the √ or "new" indicator to view a list of the drop boxes that the project is currently shared with.
→ Collaborating?: Indicates if other students are collaborating on this
project with you. Indicators are:
o Blank = no other students currently have access to the project.
o √ = one or more students are collaborating on the project with you.
o Mouse-over the √ indicator to view a list of the students who are
collaborating on the project with you.