Introduction to LearnBPS
| Site: | Learnbps |
| Class: | Moodling with LearnBPS |
| Book: | Introduction to LearnBPS |
| Printed by: | Guest user |
| Date: | Tuesday, July 14, 2026, 12:24 PM |
Moodling
ThisInteractive video explains Moodling with LearnBPS by using an analogy with modular LEGO bricks.
Use the to access the highlighting the different functions of Moodle.

Enrollment key: E-Learning
View video in full screen.
Why use?
Good Question
After all, we’ve run classes for thousands of years without the use of computers and the Web. “Chalk and talk” is still the predominant method of delivering instruction. While traditional face-to-face meetings can still be effective, applying the tools listed above opens up new possibilities for learning that weren’t possible twenty years ago. Currently, there is a lot of research into how to effectively combine online learning and face-to-face meetings in what are called “hybrid” courses or “blended learning.”
 Blended Learning courses combine the best of both worlds. Imagine moving most of your content delivery to an online environment and saving your course time for discussion, questions, and problem solving. Many instructors have found they can save time and increase student learning by allowing students to engage in the material outside of class.This allows them to use face-to-face time for troubleshooting.
Online discussions give many students the opportunity to express themselves in ways they couldn’t in a regular class. Many students are reluctant to speak in class because of shyness, uncertainty, or language issues. It’s a boon to many students to have the ability to take their time to compose questions and answers in an online discussion,and instructors report much higher participation levels online than in class.
Online Teaching Tips
This quick start guide will do just that: get you started quickly. But if you’re new to online teaching, you might want to think about how best to move your classes to an online setting. Here are some tips and links to help you:
 Don’t try to replicate your face-to-face classes online
Just because you teach several hours a day ‘live’ doesn’t mean you need to do the same online. If you must, then schedule a live BigBlueButtonBN session a couple of times a week using it as Q&A time for issues your students might have when studying at home. Alternatively, record yourself teaching on BBB - but keep it short, much shorter than your usual classes.
Use the Flipped Learning approach
Set your students tasks of doing research, watching an essential video or preparing for a project, and use that occasional live session to gather feedback from them, rather than instructions from you. Let them drive the sessions.
Avoid static resources: embrace interactivity
- It is easy to drag and drop your documents and presentations, but they use up storage space and frustrate learners who have to download them. If you have to, add them to a sharing site such as GoogleDrive and make links to them.
- Aim for alternatives which they have to engage with. Find useful sites/games/webquests you can share as URLs.
- Make the most of Forums by posing a daily teaser, puzzle or ethical dilemma. Promise a reward to the most inspired solutions.
- Encourage them to post sound or video responses in Forums - great for Language teaching or those who struggle to type.
- Add Quizzes with a short video as a ‘Description’ and questions afterwards to test their understanding.
Keep them posted!
Use the Announcements to stay in touch, informing them of new items you’ve added, daily challenges, star students etc. Encourage them to use the messaging tools. 
What is a course?
 The heart of Moodle is courses that contain activities and resources. There are about 20 different types of activities available (forums, glossaries, wikis, assignments, quizzes, choices (polls), scorm players, databases etc) and each can be customised quite a lot. The main power of this activity-based model comes in combining the activities into sequences and groups, which can help you guide participants through learning paths. Thus, each activity can build on the outcomes of previous ones.
There are a number of other tools that make it easier to build communities of learners, including blogs, messaging, participant lists etc, as well useful tools like grading, reports, integration with other systems and so on.
For more about Moodle, see https://moodle.org , and particularly the main community “course” called Using Moodle. It's crowded and busy these days, but jump in and you'll soon find interesting stuff I'm sure. The developers and the users are deliberately forced to mix in the same forums. The other great place to start is our online documentation which is a community-developed wiki site.
LearnBPS is uses the Fordson Boost Theme, so use the Turn Edit On button in the top NavBar instead of the  Note the button turn indicating editing and a blue message appears shortly indicating you can drag and drop files from your desktop
Quickstart Guide
 Set up your LearnBPS Course by adding and editing content.
Click the info icons in the image below to learn more about the function of the Atto Editor.
This is easier to see in Fullscreen
Note: All Videos embedded in the H5P activity above with the info icons.
Adding Materials ...
... for your learners
- Log in and go to the course you want to add materials
- Click the Turn Edit On button in the top NavBar
 Note the button turn indicating editing and a blue message appears shortly indicating you can drag and drop files from your desktop
 - To add files such as documents or presentations,
drag and drop from your desktop
Add/Edit Text
Use LearnBPS Atto Editor to add and edit text similar to a word processor.
Click the info icons in the image below to learn more about the function of the Atto Editor.
This is easier to see in Fullscreen
Attendance/Access
How to monitor who has accessed your course and to message students to access your course:
Instructions:
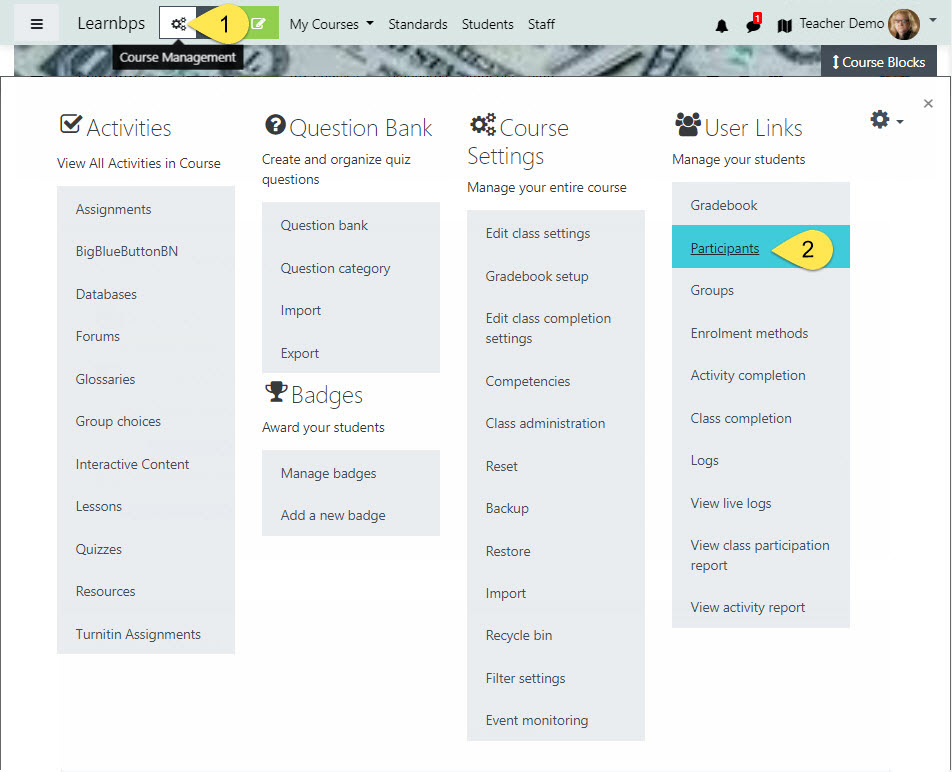
Step 1 Select the Course Management cog from the top NavBar
Step 2 from the Course Management Setting in the User Links column select Participants.

Participants Screen:
Step 3 Click on the 'Last access to class' twice to organize by descending order who has accessed the course.
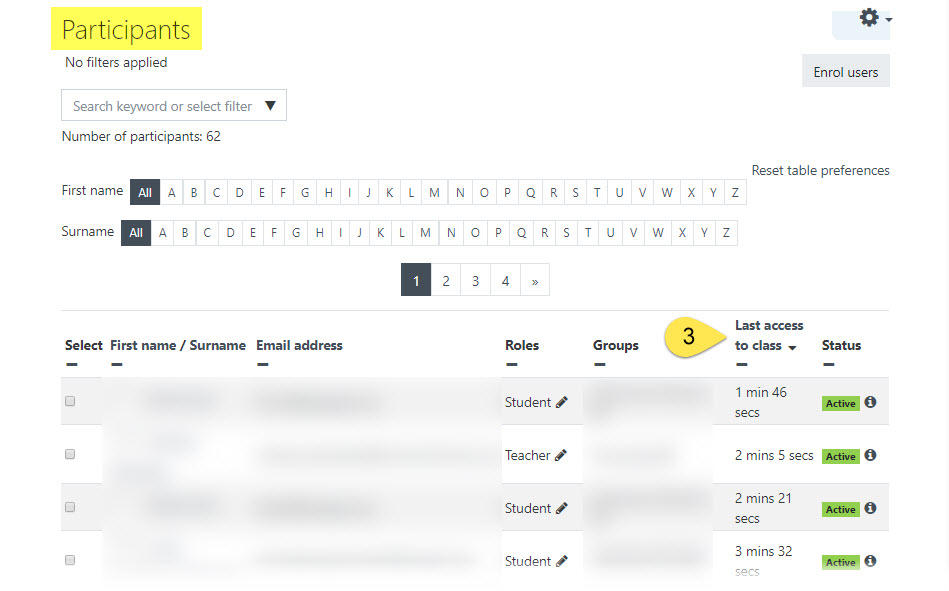
OPTIONAL
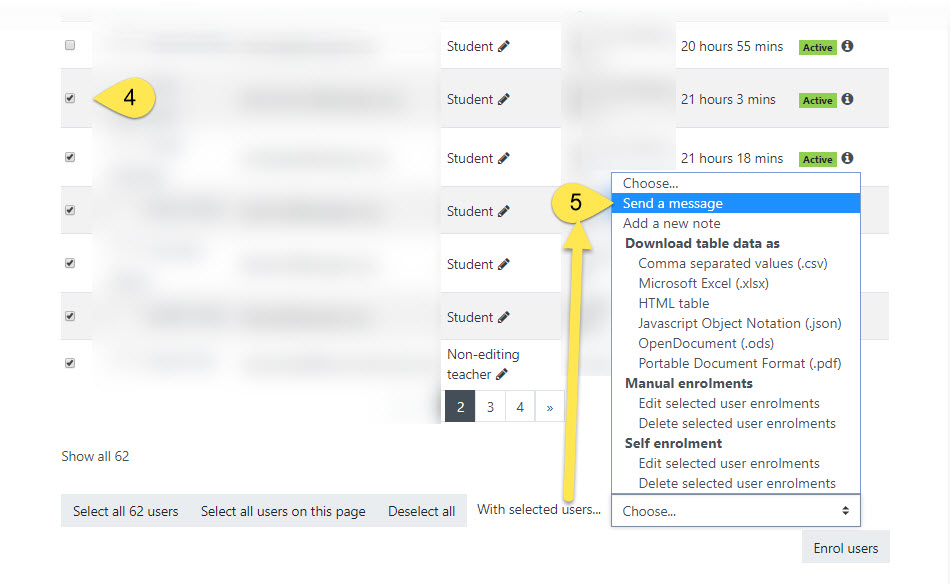
If you want to send a reminder to those who have not accessed the class recently. Scroll through the list or click show all students.
Step 4 Select which students you want to send a message.
Step 5 From the 'With selected users... choose ... 'Send a message'.
Message:
Step 6 Type your message to send to the recipients. Check your message for spelling errors.
Step 7 Check the number of participant the message will be sent.
Then click to send message .
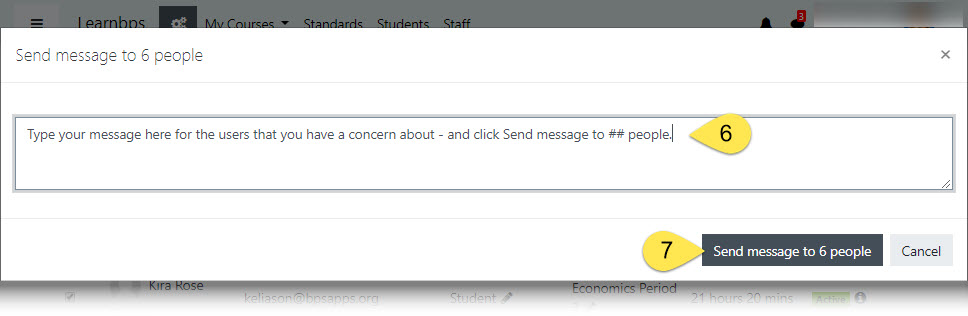
Note: When you send the message, the student gets both a message in the LearnBPS messenger and an email.
Course Management
Use LearnBPS Course Management to setup and manage (track) activity in your course
Click the info icons in the image below to learn more about the function of that management tool.
This is easier to see in Fullscreen
Course Tools
Teachers use these LearnBPS tools to help you manage your activities and time
Click the five info icons in the image below to learn more about how that can help you find what is due and what to do next.
This is easier to see in Fullscreen
Enroll Users
How to enroll instructional aides, special education teachers, or course-alike teachers into your course:
Instructions:
Step 1 Select the Course Management cog from the top NavBar
Step 2 from the Course Management Setting in the User Links column select Participants.
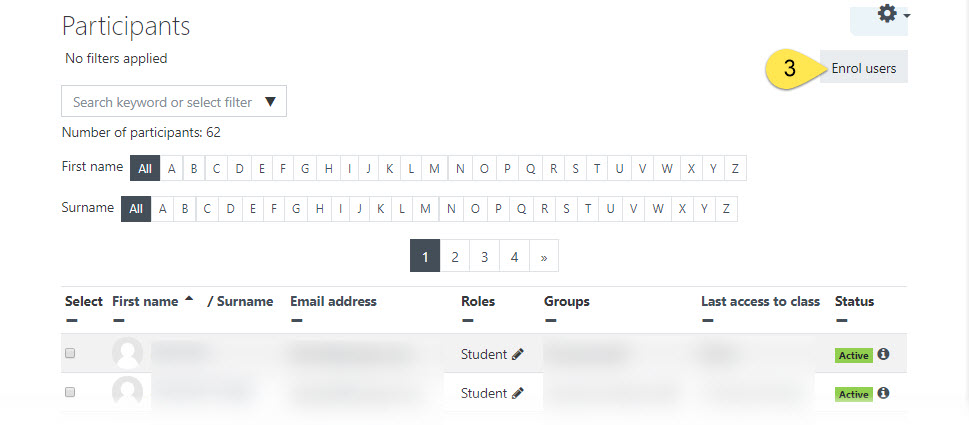
Participants Screen:
Step 3 Click on the Enroll users button.
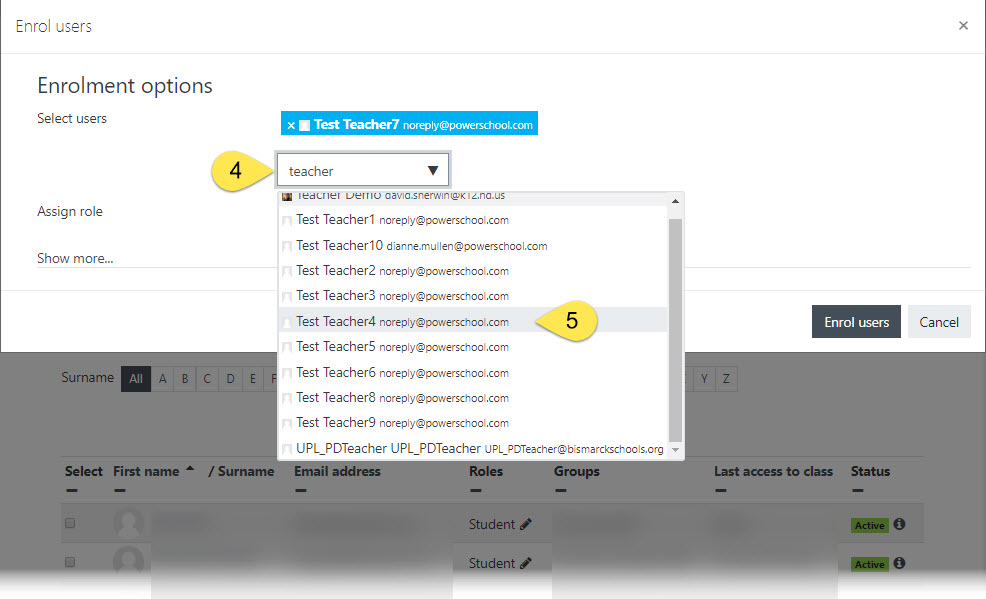
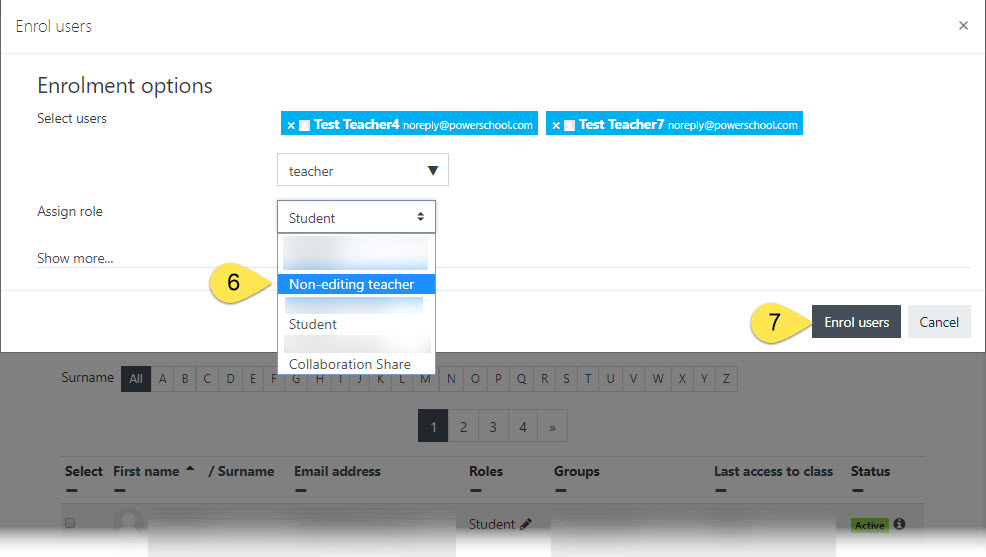
Enrollment options
You need to search LearnBPS for the users that you want to enroll and assign role.
Step 4 Select users by typing their name in the search field.
Step 5 From the pop-up list of names select the instructional aide, specialist or teacher.
Assign role:
Step 6 From the Assign role pop-down menu select the role for that user.
- Non-editing teacher:
- Instructional Aides and Specialists - this gives them access similar to a Teacher Assistant (TA) so that they cannot edit or delete content from the course
- Collaboration Share:
- to teachers that you want to share activities and resources but do not want to access your student information
Step 7 Then click the Enroll users button to add them to the course .
Note: Remind the newly enrolled members that your course will show-up on their My courses drop-down menu in the top NavBar or on their Dashboard.
Quiz Management
Use LearnBPS Quiz Action menu to setup and manage (track) activity in your quizzes
Click the info icons in the image below to learn more about the functions/reports of the Quiz Activity.
View this in Fullscreen
Notifying students in LearnBPS
- Organize information into topics and use due dates, availability dates, and completion tracking with the Completion Progress block. This gives both students and teachers the ability to see engagement in activities and resources.
https://www.youtube.com/watch?v=w8hpakwfn2o - Use an announcements forum with forced subscription, if you want the email to go out "immediately", choose Advanced when creating the post and choose "Send Forum post notifications with no editing-time delay". Otherwise there is a 15 or 30 minute delay which allows the poster to edit before it is sent/posted. If you're planning ahead, posts can be scheduled with a Display Period start date/time.
- Teachers can view engagement with their course by looking at the Participants link in their gear menu for the course. there is a Last Access to Class field which shows the last time the student viewed your course.
- As a last resort, if we really want it, there is a "Reengagement" plugin that can be added. If added, it can be set up by the teacher to notify about specific activities before the due date. It is far more useful if activities are planned out, so it may not help much in this situation.
Safe/Secure Exam Browser
LearnBPS supports a safe/secure exam browser on Chromebooks.
WideOpenSchool
Today Common sense launched a brand-new, free online resource to support families and educators who are transitioning to remote learning as a result of the coronavirus. WideOpenSchool